(Day 82) IoC Container- @ Config, Java Config

Review
어제는 애너테이션을 이용해서 Spring Framework의 IoC 컨테이너가 의존 객체들을 생성하는 방법들을 알아봤다. 주요 포인트는 아래와 같다.
- IoC 컨테이너의 원리는? 컨베이어 벨트와 작업자 객체의 비유
- @Autowired 를 이용하여 의존객체를 주입하는 방법은?
- BeanPostProcessor 동작 원리와 사용법은?
- 생성자를 통해 의존 객체를 주입하는 방법은?
- 의존 객체 주입시 여러 방법이 있는데 (생성자, 세터, 필드) 각각의 장단점은? 어떨 때 써야 하는가?
- @Qualifier, @Resource 가 무엇을 하는것인가?
- @Resource는 java 확장 lib이며 component + qualifier
- 객체 생성을 자동화할 수 있는가? (@Component)
- @Controller, @Service, @Repository는 각각 어떤 객체에게 붙여주는가? 왜 이런 분류를 해뒀나?
- XML 대신 Java Config를 사용해서 IoC Container 설정하는 방법은?
- @Bean, @Configuration 이 애너테이션들은 무엇인가? 어디에 쓰는가?
- @PropertySource, @Value를 이용하여
*.properties파일의 값을 다룰 수 있는가?- 이건 어디에 쓰는가? 하드코딩 방지
Use-case
유즈케이스 식별 가이드라인 2
CRUD에 해당하는 경우 한 개의 유즈케이스로 합치는 것이 관리하기 편하다.
예를 들면, 학사관리 시스템에서 교육과정에 대해 등록/조회/변경/삭제 기능이 있다면 과정관리 같은 하나의 유즈케이스로 합친다는 것이다. 다만, 합쳐서 2-4주 내에 개발이 가능한 경우만 CRUD를 합쳐서 하나의 유즈케이스로 작성하는 것이 좋다. 합쳤을 때 해당 유즈케이스에 대한 개발 분량이 4주를 초과하는 경우는 분리하여 각각의 유즈케이스를 작성하는 것이 맞을 것이다. (물론 이야기한 4주라는 기준은 예시이다.)
서로 관련된 유즈케이스는 하나의 유즈케이스로 합친다.
로그인, 로그아웃 같은 관련된 작은 유즈케이스들은 사용자 인증같은 하나의 유즈케이스로 합쳐서 작성한다. 이러한 가이드라인은 반드시 이렇게 해야 한다 같은 원칙이라기보단, 변수의 네이밍과 같이 편의를 위한 것이다.
여러 유즈케이스에 중복되는 시나리오가 있다면 별도의 유즈케이스로 분리한다.
게시글의 [등록, 변경, 삭제]를 각각의 유즈케이스로 작성할 때를 가정해보자. 각각의 유즈케이스는 모두 앞단에 중복되는 시나리오가 있다. 그것은 사용자 인증이다.
사용자 인증은 첫번째 가이드라인상 업무가 아니기 때문에 유즈케이스가 될 수 없지만, 다른 업무들을 실행하기 위한 공통된 시나리오에 해당하기 때문에 별도의 유즈케이스로 분리한다.
시나리오는 사용자가 시스템에서 행하는 어떠한 작업을 의미하는 용어로 쓰였다.
이런 사용자 인증은 다른 유즈케이스에 include(포함)하는 관계로 표현된다.
extend - 마찬가지로 업무는 아니지만, 공통된 시나리오라서 별도의 유즈케이스로 분리한 경우
사용자 인증은 공통된 시나리오라 별도의 유즈케이스로 분리하고 include로 표현했는데, 비슷한 이유로 분리하고 extend(확장)로 표현해야 하는 경우가 있다.
먼저 그 차이부터 적으면, include는 필수인 경우이고, extend는 필수가 아닌 경우이다.
내 생각에 가장 직관적인 예시는 이것이다.
게시판에서 글을 올릴 때,
- 사용자 인증은 필수이다. (include 포함)
- 파일 첨부는 선택이다. (extend 확장)
- 다만, 파일 첨부를 게시글 등록에 필수적으로 만들 것이면 include로 표현하는 게 맞다.
include, extend는 관계를 의미하므로, 주어와 목적어가 있다. 여기선 게시글 등록이 주어가 되고, 사용자 인증 및 파일 첨부가 목적어가 된다. 화살표의 뾰족한 머리가 목적어를 향하게 표현한다.
서술하면, 게시글 등록은 사용자 인증을 포함한다. 게시글 등록은 파일첨부를 확장한다.
유즈케이스 목록 예시
예시 작성해보고 팀프로젝트 모두의 스터디를 위한 유즈케이스를 작성해보자
액터
- 사용자
- 로그인하지 않은 사용자
- 회원
- 회원 가입한 사용자
- 학생: 개인출석 및 과제를 관리하는 회원
- 매니저: 과정을 관리하는 회원
- 강사: 강의를 관리하는 회원
- 관리자: 전체 시스템을 관리하는 회원
- 회원 가입한 사용자
유즈케이스
- 사용자 (로그인하지 않은 상태)
- 과정조회
- 회원가입(학생, 강사, 매니저)
- 회원탈퇴(학생, 강사, 매니저)
- 로그인
- 회원
- 로그인
- 로그아웃
- 과정조회
- 게시글관리(전체게시글조회, 개인게시글관리)
- 매니저
- 과정관리
- 출석관리
- 게시글관리(전체 게시글)
- 강사
- 과정조회
- 과제관리(전체 학생에 대하여)
- 출석조회
- 학생
- 과정조회
- 과정신청
- 과정신청취소
- 과정신청조회
- 출석조회
- 과제관리(본인의 과제에 대하여)
- 관리자
- 회원관리(전체회원)
mvc-app 만들기
gradle init
그레이들 설정
1
2
3
4
5
6
7
8
9
10
11
12
13
14
15
16
17
18
19
20
21
22
23
24
25
26
27
28
29
30
31
32
33
34
35
36
37
38
39
40
41
42
43
44
45
46
47
48
49
50
51
52
53
/*
 * This file was generated by the Gradle 'init' task.
 *
 * This generated file contains a sample Java application project to get you started.
 * For more details on building Java & JVM projects, please refer to https://docs.gradle.org/8.6/userguide/building_java_projects.html in the Gradle documentation.
 */

plugins {
    // Apply the application plugin to add support for building a CLI application in Java.
    id 'application'
}

repositories {
    // Use Maven Central for resolving dependencies.
    mavenCentral()
}

dependencies {

    // Spring WebMVC 프레임워크 라이브러리
    implementation 'org.springframework:spring-webmvc:5.3.32'

    // log4j 2.x 라이브러리
    implementation 'org.apache.logging.log4j:log4j-core:2.23.1'

    implementation 'org.apache.tomcat.embed:tomcat-embed-jasper:9.0.85'
    implementation 'javax.servlet:jstl:1.2'

    // Use JUnit Jupiter for testing.
    testImplementation libs.junit.jupiter

    testRuntimeOnly 'org.junit.platform:junit-platform-launcher'

    // This dependency is used by the application.
    implementation libs.guava
}

// Apply a specific Java toolchain to ease working on different environments.
java {
    toolchain {
        languageVersion = JavaLanguageVersion.of(21)
    }
}

application {
    // Define the main class for the application.
    mainClass = 'bitcamp.App'
}

tasks.named('test') {
    // Use JUnit Platform for unit tests.
    useJUnitPlatform()
}
웹서버 실행을 위한 코드 작성 (톰캣)
1
2
3
4
5
6
7
8
9
10
11
12
13
14
15
16
17
18
19
20
21
22
23
24
25
26
27
28
29
30
31
32
33
34
35
36
37
38
39
40
41
42
43
44
45
46
47
48
49
50
51
52
53
54
55
56
57
package bitcamp;

import java.io.File;
import org.apache.catalina.WebResourceRoot;
import org.apache.catalina.connector.Connector;
import org.apache.catalina.core.StandardContext;
import org.apache.catalina.startup.Tomcat;
import org.apache.catalina.webresources.DirResourceSet;
import org.apache.catalina.webresources.StandardRoot;

public class App {

    public static void main(String[] args) throws Exception {
        // 톰캣 서버를 구동시키는 객체 준비
        Tomcat tomcat = new Tomcat();

        // 서버의 포트 번호 설정
        tomcat.setPort(8888);

        // 톰캣 서버를 실행하는 동안 사용할 임시 폴더 지정
        tomcat.setBaseDir("./temp");

        // 톰캣 서버의 연결 정보를 설정
        Connector connector = tomcat.getConnector();
        connector.setURIEncoding("UTF-8");

        // 톰캣 서버에 배포할 웹 애플리케이션의 환경 정보 준비
        StandardContext ctx = (StandardContext) tomcat.addWebapp(
            "/", // 컨텍스트 경로(웹 애플리케이션 경로)
            new File("src/main/webapp").getAbsolutePath() // 웹 애플리케이션 파일이 있는 실제 경로
        );
        ctx.setReloadable(true);

        // 웹 애플리케이션 기타 정보 설정
        WebResourceRoot resources = new StandardRoot(ctx);

        // 웹 애플리케이션의 서블릿 클래스 등록
        resources.addPreResources(new DirResourceSet(
            resources, // 루트 웹 애플리케이션 정보
            "/WEB-INF/classes", // 서블릿 클래스 파일의 위치 정보
            new File("build/classes/java/main").getAbsolutePath(), // 서블릿 클래스 파일이 있는 실제 경로
            "/" // 웹 애플리케이션 내부 경로
        ));

        // 웹 애플리케이션 설정 정보를 웹 애플리케이션 환경 정보에 등록
        ctx.setResources(resources);

        // 톰캣 서버 구동
        tomcat.start();

        // 톰캣 서버를 구동한 후 종료될 때까지 JVM을 끝내지 말고 기다린다.
        tomcat.getServer().await();

        System.out.println("서버 종료!");
    }
}
webapp 디렉토리 만들어서 준비 (app/src/main/webapp/WEB-INF)
index.html 만들어서 서블릿 컨테이너가 요청에 응답하는지 확인 (아래는 예시)
1
2
3
4
5
6
7
8
9
10
11
12
13
<!doctype html>
<html lang="en">
<head>
  <meta charset="UTF-8">
  <meta name="viewport"
        content="width=device-width, user-scalable=no, initial-scale=1.0, maximum-scale=1.0, minimum-scale=1.0">
  <meta http-equiv="X-UA-Compatible" content="ie=edge">
  <title>Spring WebMVC 예제</title>
</head>
<body>
<h1>Spring WebMVC 예제</h1>
</body>
</html>
App.java에서 설정한 톰캣 포트로 요청 보내보기
index.html이라고 이름짓는 이유는? 요청한 자원이 명시되지 않으면 welcome-file으로 응답함.
1
2
3
4
5
  <welcome-file-list>
    <welcome-file>index.html</welcome-file>
    <welcome-file>index.htm</welcome-file>
    <welcome-file>default.htm</welcome-file>
  </welcome-file-list>
하위 경로에 WEB-INF 추가하여 서블릿 설정 넣기
- web.xml
- app-servlet.xml
1
2
3
4
5
6
7
8
9
10
11
12
13
14
15
16
17
18
19
20
21
22
23
24
25
26
27
28
29
30
31
32
33
34
35
36
37
38
39
40
41
42
43
44
45
46
47
48
49
50
51
52
53
<?xml version="1.0" encoding="UTF-8"?>
<web-app xmlns="http://xmlns.jcp.org/xml/ns/javaee"
  xmlns:xsi="http://www.w3.org/2001/XMLSchema-instance"
  xsi:schemaLocation="http://xmlns.jcp.org/xml/ns/javaee
                      http://xmlns.jcp.org/xml/ns/javaee/web-app_4_0.xsd"

<!--  http와 같은 프로토콜들을 스키마/스킴 이라고 부르기도 한다. 스키마 파일의 위치를 가리키는 형태는,
schemaLocation = "네임스페이스이름[화이트스페이스]스키마파일URL[화이트스페이스]동일하게 다 할 때까지 반복.." -->

<!--  위와 같은 방식으로 쓴다. 화이트스페이스는 [탭,스페이스,뉴라인]을 모두 포함해서 부르는 말이다.-->

  version="4.0" metadata-complete="false">

  <description>
    스프링 Web MVC 프레임워크 예제 테스트
  </description>

  <display-name>java-spring-webmvc</display-name>

  <!-- Spring Web MVC의 프론트 컨트롤러 역할을 수행할 서블릿을 지정한다. -->

  <!-- DispatcherServlet 배치하기 : 방법1-->

  <!-- => DispatcherServlet은 자체적으로 IoC 컨테이너(기본: XmlWebApplicationContext)를 보유하고 있다.
       => 파라미터를 사용하여 IoC 컨테이너의 설정 파일을 지정해야 한다.
          초기화 파라미터명: contextConfigLocation
          초기화 파라미터값: 예) /WEB-INF/app-servlet.xml
       => 설정하고 싶지 않다면 init-value를 비워둬라.
  -->
  <servlet>
    <servlet-name>app</servlet-name>
    <servlet-class>org.springframework.web.servlet.DispatcherServlet</servlet-class>
    <init-param>
      <param-name>contextConfigLocation</param-name>
      <param-value>/WEB-INF/app-servlet.xml</param-value>
    </init-param>
    <!-- 서블릿을 요청하지 않아도 웹 애플리케이션을 시작시킬 때 자동 생성되어
         IoC 컨테이너를 준비할 수 있도록
         다음 옵션을 붙인다. -->
    <load-on-startup>1</load-on-startup>
  </servlet>
  <servlet-mapping>
    <servlet-name>app</servlet-name>
    <url-pattern>/app/*</url-pattern>
  </servlet-mapping>

  <welcome-file-list>
    <welcome-file>index.html</welcome-file>
    <welcome-file>index.htm</welcome-file>
    <welcome-file>default.htm</welcome-file>
  </welcome-file-list>

</web-app>
1
2
3
4
5
6
7
8
9
10
11
12
<?xml version="1.0" encoding="UTF-8"?>
<beans xmlns="http://www.springframework.org/schema/beans"
  xmlns:context="http://www.springframework.org/schema/context"
  xmlns:xsi="http://www.w3.org/2001/XMLSchema-instance"
  xsi:schemaLocation="http://www.springframework.org/schema/beans
        https://www.springframework.org/schema/beans/spring-beans.xsd
        http://www.springframework.org/schema/context
        https://www.springframework.org/schema/context/spring-context.xsd">

  <context:component-scan base-package="bitcamp"/>

</beans>
디스패처 서블릿을 app으로 네이밍하는 것은 예제 코드에서부터 시작되었는데, 컨벤션이 되었다.
web.xml에 작성된 주석들이 중요하다!!
log4j를 설정파일을 추가한다.
추가할 파일은 app/src/main/resources/log4j2.xml이다.
1
2
3
4
5
6
7
8
9
10
11
12
13
14
15
16
17
18
19
20
21
22
23
24
25
<?xml version="1.0" encoding="UTF-8"?>
<Configuration>

  <!-- 로그 출력 형태를 정의한다. -->
  <Appenders>

    <!-- 표준 출력 장치인 콘솔로 출력하는 방식을 정의한다. -->
    <Console name="stdout" target="SYSTEM_OUT">
      <PatternLayout pattern="[%-5level] %d{yyyy-MM-dd} [%t] %c{1} - %msg%n" />
    </Console>

    <File name="file" fileName="./logs/file/sample.log" append="false">
      <PatternLayout pattern="[%-5level] %d{yyyy-MM-dd} [%t] %c{1} - %msg%n" />
    </File>
  </Appenders>

  <!-- 로그 출력을 적용할 대상과 로그 출력 레벨을 지정한다. -->
  <Loggers>

    <!-- Root => 모든 대상에 적용할 기본 로그 출력 형식과 레벨 -->
    <Root level="info" additivity="false">
      <AppenderRef ref="stdout" /> <!-- 로그를 출력할 때 사용할 출력 방식 지정 -->
    </Root>
  </Loggers>
</Configuration>
이제 System.out.printf(“%s”,printStr) 같은 방식으로 로그를 수동으로 관리하지 않아도 된다. 개발 완료 이후 디버그용 로그를 제거한다거나 하는 작업도 필요하지 않다. log4j 로 로그 출력 레벨, 로그 출력 대상을 xml 파일 하나에서 간단하게 설정할 수 있다.
단적으로, <Root level="info" additivity="false"> 에서 info를 debug로 바꾸면, 디버깅을 위한 로그까지 더 자세하게 출력해준다. 개발하는 동안에는 level을 debug로 설정하고 보는 것이 좋다. 그러면 이런 로그들을 볼 수 있다.
1
2
3
[INFO ] 2024-03-13 [main] DispatcherServlet - Initializing Servlet 'app'
[DEBUG] 2024-03-13 [main] XmlWebApplicationContext - Refreshing WebApplicationContext for namespace 'app-servlet'
[DEBUG] 2024-03-13 [main] ClassPathBeanDefinitionScanner - Identified candidate component class: file [C:\Users\jh\git\mystudy\mvc-app\app\build\classes\java\main\bitcamp\HelloController.class]
이러한 로깅 라이브러리는 개발에 있어서 선택이 아니다. 필수다. 출력 레벨, 출력 대상(클래스 등), 출력 방법(파일/기본 스트림 등..)을 각 클래스마다, 프로젝트마다 개발자가 직접 설정한다고 생각해보자… 끔찍하다.
log4j의 구현?
그럼 log4j는 어떻게 구현된 것인가? 또 리플렉션으로 메서드나 변수들을 확인해서 처리한 것인가? 사실 그렇진 않다. 로깅을 지원하는 클래스(로깅의 대상이 되는 클래스)들이 어떤 때 어떤 로그를 어떤 조건에 따라서 출력할 것인지 하나하나 코드를 작성해둔 것이다. Spring web-mvc에서는 DispatcherServlet 클래스가 그렇다.
프론트 컨트롤러 패턴이 적용되었기 때문에 모든 요청을 DispatcherServlet이 받게 되니 자연스럽게 이렇게 된 것이다. DispathcerServlet이 아주 복잡해졌지만, 그것에서만 작성하면 되었기에 아주 편리한 로깅 시스템을 갖게 된 것이다.
코드단을 보면 logging의 원리를 확인해 볼 수 있다. 여기서 하나 더 유추해볼 수 있는 점은, logger가 꼭 log4j가 아니여도 동일한 인터페이스를 사용한다면 사용이 가능할 것이다.라는 점이다.
1
2
3
4
5
6
7
8
9
10
11
12
13
14
15
16
  private void initMultipartResolver(ApplicationContext context) {
    try {
      this.multipartResolver = (MultipartResolver)context.getBean("multipartResolver", MultipartResolver.class);
      if (this.logger.isTraceEnabled()) {
        this.logger.trace("Detected " + this.multipartResolver);
      } else if (this.logger.isDebugEnabled()) {
        this.logger.debug("Detected " + this.multipartResolver.getClass().getSimpleName());
      }
    } catch (NoSuchBeanDefinitionException var3) {
      this.multipartResolver = null;
      if (this.logger.isTraceEnabled()) {
        this.logger.trace("No MultipartResolver 'multipartResolver' declared");
      }
    }

  }
1
2
3
4
5
6
7
8
9
10
11
12
13
14
15
16
17
18
19
20
21
22
23
24
25
26
27
28
29
30
31
32
33
34
35
36
protected void render(ModelAndView mv, HttpServletRequest request, HttpServletResponse response) throws Exception {
    Locale locale = this.localeResolver != null ? this.localeResolver.resolveLocale(request) : request.getLocale();
    response.setLocale(locale);
    String viewName = mv.getViewName();
    View view;
    if (viewName != null) {
      view = this.resolveViewName(viewName, mv.getModelInternal(), locale, request);
      if (view == null) {
        throw new ServletException("Could not resolve view with name '" + mv.getViewName() + "' in servlet with name '" + this.getServletName() + "'");
      }
    } else {
      view = mv.getView();
      if (view == null) {
        throw new ServletException("ModelAndView [" + mv + "] neither contains a view name nor a View object in servlet with name '" + this.getServletName() + "'");
      }
    }

    if (this.logger.isTraceEnabled()) {
      this.logger.trace("Rendering view [" + view + "] ");
    }

    try {
      if (mv.getStatus() != null) {
        request.setAttribute(View.RESPONSE_STATUS_ATTRIBUTE, mv.getStatus());
        response.setStatus(mv.getStatus().value());
      }

      view.render(mv.getModelInternal(), request, response);
    } catch (Exception var8) {
      if (this.logger.isDebugEnabled()) {
        this.logger.debug("Error rendering view [" + view + "]", var8);
      }

      throw var8;
    }
  }
app-servlet.xml 파일에 대해서
WEB-INF 말고 다른 곳에 두지 마라.
왜냐하면, WEB-INF가 아니면 클라이언트가 요청해서 받아볼 수 있기 때문이다. JDBC 연결을 위한 정보도 들어갈 수 있는 설정파일이 노출되는 것은 치명적인 결함이다.
클라이언트에게 노출되면 안되는 정보는 WEB-INF 경로 밑에 둬야 한다.
1
2
3
4
5
6
7
8
9
10
11
12
13
14
15
16
17
18
19
20
21
22
23
24
25
26
27
28
29
30
31
32
33
34
35
36
37
38
39
40
41
42
43
44
<?xml version="1.0" encoding="UTF-8"?>
<web-app xmlns="http://xmlns.jcp.org/xml/ns/javaee"
  xmlns:xsi="http://www.w3.org/2001/XMLSchema-instance"
  xsi:schemaLocation="http://xmlns.jcp.org/xml/ns/javaee
                      http://xmlns.jcp.org/xml/ns/javaee/web-app_4_0.xsd"
  version="4.0" metadata-complete="false">

  <description>
    스프링 Web MVC 프레임워크 예제 테스트
  </description>

  <display-name>java-spring-webmvc</display-name>

  <!-- Spring Web MVC의 프론트 컨트롤러 역할을 수행할 서블릿을 지정한다. -->

  <!-- DispatcherServlet 배치하기 : 방법2-->

  <!-- => Spring IoC 설정 파일을 웹 디렉토리에 두기
       => 주의!
          일반 웹 디렉토리는 클라이언트에서 접근할 수 있기 때문에
          설정 정보가 노출될 위험이 있다.
          절대로 일반 웹 디렉토리에 두지 말라!
  -->
  <servlet>
    <servlet-name>app</servlet-name>
    <servlet-class>org.springframework.web.servlet.DispatcherServlet</servlet-class>
    <init-param>
      <param-name>contextConfigLocation</param-name>
      <param-value>/config/app-servlet.xml</param-value>
    </init-param>
    <load-on-startup>1</load-on-startup>
  </servlet>
  <servlet-mapping>
    <servlet-name>app</servlet-name>
    <url-pattern>/app/*</url-pattern>
  </servlet-mapping>

  <welcome-file-list>
    <welcome-file>index.html</welcome-file>
    <welcome-file>index.htm</welcome-file>
    <welcome-file>default.htm</welcome-file>
  </welcome-file-list>

</web-app>
의도
IoC 컨테이너를 안쓰겠다면 <param-value></param-value>
1
2
3
4
5
6
    <init-param>
      <param-name>contextConfigLocation</param-name>
<!--      <param-value>/WEB-INF/app-servlet.xml</param-value>-->
      <param-value></param-value>

    </init-param>
비워두면 자동으로 찾는다.
1
2
3
4
    <init-param>
      <param-name>contextConfigLocation</param-name>
<!-- 비워두면 자동으로 찾는다. -->
    </init-param>
아래 코드의 주석들로 정리.
1
2
3
4
5
6
7
8
9
10
11
12
13
14
15
16
17
18
19
20
21
22
23
24
25
26
27
28
29
30
31
32
33
34
35
36
37
38
39
40
41
42
43
44
45
46
47
48
49
50
51
<?xml version="1.0" encoding="UTF-8"?>
<web-app xmlns="http://xmlns.jcp.org/xml/ns/javaee"
  xmlns:xsi="http://www.w3.org/2001/XMLSchema-instance"
  xsi:schemaLocation="http://xmlns.jcp.org/xml/ns/javaee
                      http://xmlns.jcp.org/xml/ns/javaee/web-app_4_0.xsd"
  version="4.0" metadata-complete="false">

  <description>
    스프링 Web MVC 프레임워크 예제 테스트
  </description>

  <display-name>java-spring-webmvc</display-name>

  <!-- Spring Web MVC의 프론트 컨트롤러 역할을 수행할 서블릿을 지정한다. -->

  <!-- DispatcherServlet 배치하기 : 방법3-->

  <!-- => contextConfigLocation 초기화 변수가 없으면
          다음 규칙에 따라 작성된 IoC 설정 파일을 자동으로 찾는다.
          /WEB-INF/서블릿이름-servlet.xml
          해당 파일을 찾지 못하면 예외가 발생한다.
       => contextConfigLocation 초기화 변수가 있다면,
          - 지정한 설정 파일을 로딩하여 객체를 준비한다.
          - 만약 변수의 값이 비어 있다면, 아무런 객체를 생성하지 않는다.
            변수가 없을 때와 달리 예외가 발생하지 않는다.
       => 즉 contextConfigLocation 변수를 생략하는 것과
          변수의 값을 비워두는 것은 다르다.
  -->
  <servlet>
    <servlet-name>app</servlet-name>
    <servlet-class>org.springframework.web.servlet.DispatcherServlet</servlet-class>
    <!--
    <init-param>
      <param-name>contextConfigLocation</param-name>
      <param-value></param-value>
    </init-param>
    -->
    <load-on-startup>1</load-on-startup>
  </servlet>
  <servlet-mapping>
    <servlet-name>app</servlet-name>
    <url-pattern>/app/*</url-pattern>
  </servlet-mapping>

  <welcome-file-list>
    <welcome-file>index.html</welcome-file>
    <welcome-file>index.htm</welcome-file>
    <welcome-file>default.htm</welcome-file>
  </welcome-file-list>

</web-app>
ContextLoaderListener 으로 대체하기
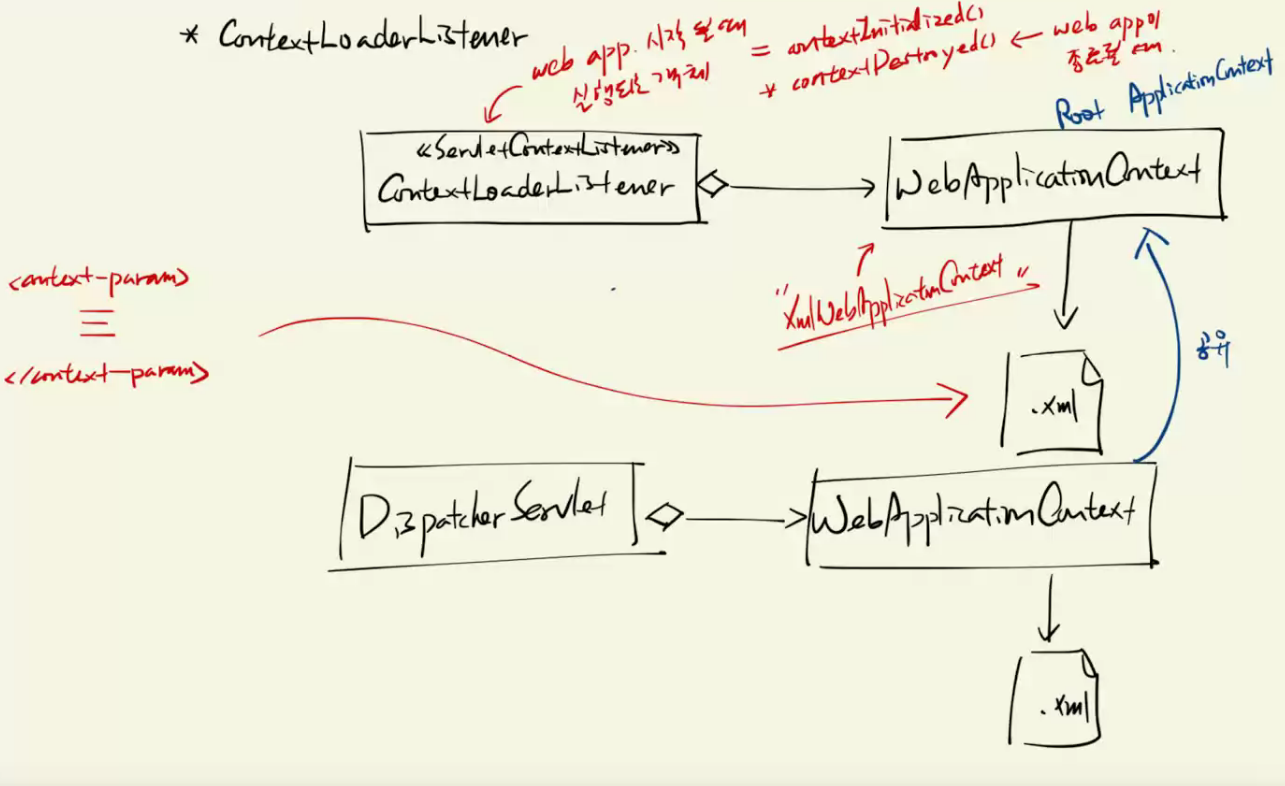
페이지 컨트롤러를 DispatcherServlet에 연결된 IoC 컨테이너에서가 아니라, ContextLoaderListener의 IoC 컨테이너에서 만들기
아래는 가능은 한데, 사실 아래 예제에서는 굳이 저렇게 할 이유가 없다. DispatcherServlet이 자기가 가진 IoC 컨테이너 뿐만 아니라 부모 객체의 IoC 컨테이너 안의 객체도 쓸 수 있다는 것을 보이기 위한 예제인 것이다.
그것을 왜 보였는가? 컨트롤러 객체들은 디스패처서블릿의 IoC 컨테이너에서 관리하는데, 컨트롤러 객체들이 공통적으로 사용하는 객체들(DAO, TxManager 등)은 ContextLoaderListener의 IoC 컨트롤러에서, 다시 말해 부모 객체의 IoC 컨테이너에서 공통된 의존 객체들을 꺼내 쓰는 일이 있기 때문이다.
1
2
3
4
5
6
7
8
9
10
11
12
13
14
15
16
17
18
19
20
21
22
23
24
25
26
27
28
29
30
31
32
33
34
35
36
37
38
39
40
41
42
43
44
45
46
47
48
49
50
51
<?xml version="1.0" encoding="UTF-8"?>
<web-app xmlns="http://xmlns.jcp.org/xml/ns/javaee"
  xmlns:xsi="http://www.w3.org/2001/XMLSchema-instance"
  xsi:schemaLocation="http://xmlns.jcp.org/xml/ns/javaee
                      http://xmlns.jcp.org/xml/ns/javaee/web-app_4_0.xsd"
  version="4.0" metadata-complete="false">

  <description>
    스프링 Web MVC 프레임워크 예제 테스트
  </description>

  <display-name>java-spring-webmvc</display-name>

  <!-- 글로벌 Spring IoC 컨테이너 준비 -->
  <listener>
    <listener-class>org.springframework.web.context.ContextLoaderListener</listener-class>
  </listener>

  <!-- ContextLoaderListener가 사용할 IoC 컨테이너 설정 파일 정보 -->
  <context-param>
    <param-name>contextConfigLocation</param-name>
    <param-value>/WEB-INF/config/app-context.xml</param-value>
  </context-param>

  <!-- => DispatcherServlet의 IoC 컨테이너를 사용하고 싶지 않다면,
          contextConfigLocation 초기화 파라미터의 값을 빈 채로 두면 된다.
          초기화 파라미터 변수가 없으면 안된다.
          왜?
          없으면 /WEB-INF/서블릿이름-servlet.xml 파일을 자동으로 찾기 때문이다.
  -->
  <servlet>
    <servlet-name>app</servlet-name>
    <servlet-class>org.springframework.web.servlet.DispatcherServlet</servlet-class>
    <init-param>
      <param-name>contextConfigLocation</param-name>
      <param-value></param-value>
    </init-param>
    <load-on-startup>1</load-on-startup>
  </servlet>
  <servlet-mapping>
    <servlet-name>app</servlet-name>
    <url-pattern>/app/*</url-pattern>
  </servlet-mapping>

  <welcome-file-list>
    <welcome-file>index.html</welcome-file>
    <welcome-file>index.htm</welcome-file>
    <welcome-file>default.htm</welcome-file>
  </welcome-file-list>

</web-app>
위 내용에 대해서
ApplicationContext가 IoC Container 역할을 한다.
org.springframework.web.context.ContextLoader 클래스를 보면, Spring Framework에서 Spring에서 어떻게 구현된 것인지 볼 수 있다.
살짝 보면…
1
2
3
4
5
6
7
8
9
10
11
12
13
14
15
16
17
18
19
20
21
22
23
24
25
protected void configureAndRefreshWebApplicationContext(ConfigurableWebApplicationContext wac, ServletContext sc) {
    String configLocationParam;
    if (ObjectUtils.identityToString(wac).equals(wac.getId())) {
      configLocationParam = sc.getInitParameter("contextId");
      if (configLocationParam != null) {
        wac.setId(configLocationParam);
      } else {
        wac.setId(ConfigurableWebApplicationContext.APPLICATION_CONTEXT_ID_PREFIX + ObjectUtils.getDisplayString(sc.getContextPath()));
      }
    }

    wac.setServletContext(sc);
    configLocationParam = sc.getInitParameter("contextConfigLocation");
    if (configLocationParam != null) {
      wac.setConfigLocation(configLocationParam);
    }

    ConfigurableEnvironment env = wac.getEnvironment();
    if (env instanceof ConfigurableWebEnvironment) {
      ((ConfigurableWebEnvironment)env).initPropertySources(sc, (ServletConfig)null);
    }

    this.customizeContext(sc, wac);
    wac.refresh();
  }
여기까지가 git\eomcs-java\eomcs-spring-webmvc\app\src-01~05 까지 내용이다.